

GDPR Compliant Pardot Forms: Adding a Dynamic Opt‑In Checkbox
If you’re using Pardot, creating a dynamic form system to capture new prospect opt-ins can feel like a bit of a headache. Here’s a simple, no-frills setup to add an opt‑in checkbox to your forms, and hide it for prospects who’ve already opted in.
Hiding the checkbox for users who’ve already opted in helps reduce friction and avoid redundancy. This approach assumes you're storing consent properly and offering clear ways to opt out, such as in email footers or a preference center.
As always, make sure this setup aligns with your own compliance policies and legal guidance.
If you need more help, feel free to contact me here!
Step 1: Create a “Email Opt-In” field in Pardot
Head to Account Engagement Settings → Object and Field Configuration → Prospect Fields. Create a new custom field “Email Opt-In” with the following settings:
Type = Radio Button
Select “Use pre-defined values…”
Add exactly two values with no Prefill:
Yes
No
Create two additional text fields: Opt-In Date and Opt-In Source, both required data points for GDPR
Step 2: Add the Checkbox Field on Your Form
On your form, Click “+Add New Field”

In the Basic Tab:
For “Prospect Field”, select “Email Opt In”, and click “Load Default Data”
Delete the text from the “Label” field
Change the “Type” selection from “Radio Button” to “Checkbox”
Set “Data Format” to Text
Ensure the “Required” checkbox is unchecked

On the “Advanced” tab, check to select “Always display even if previously completed”
Delete text from the “Error Message” field
In the “Values” tab,
Delete the “No” Option
By clicking the letter “A”, add the text “By checking the box, you consent to receiving marketing emails.“

Click “Save changes” when completed
Step 3: Set the Form Completion Actions
Navigate to the form’s “Completion Actions” tab, scroll down to the Completion Actions (below Thank You content)
Click “+ Add Conditional Group”
Set the Conditional Group per the screenshot below:
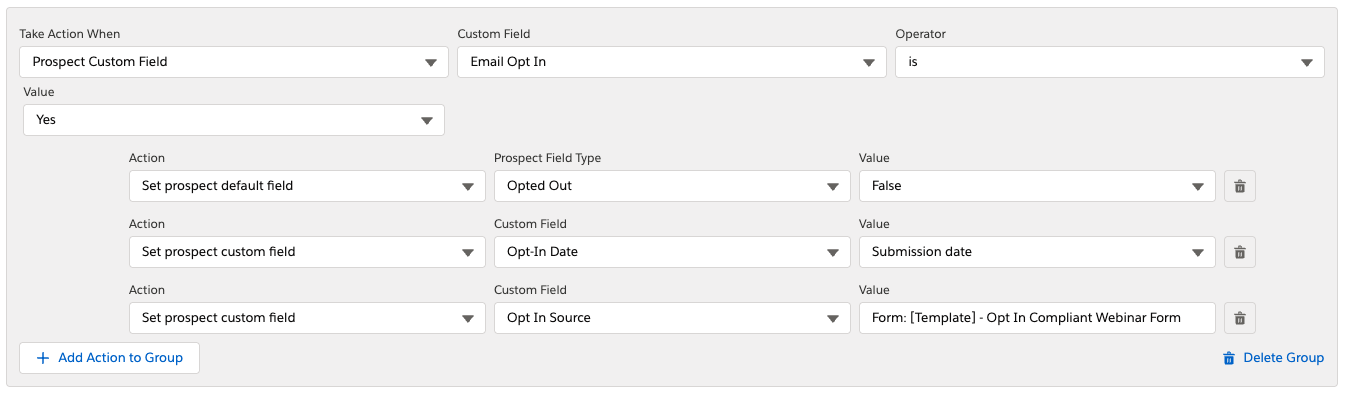
Take Action When: Prospect Custom Field: Email Opt In is “Yes”
Set Prospect Default Field Opted Out to False
Set Prospect Custom Field Opt-In Date to “Submission Date” (system value)
Set Prospect Custom Field Opt In Source to “Form: [Insert the form name here]”. For Example, “Form: “2023_05_the_key_to_superior_content_rendering_whitepaper - White [Template]”
Set a second Conditional Group per the screenshot below:

Take Action When: Prospect Custom Field: Email Opt In isn’t “Yes”
Set Prospect Default Field Opted Out to True
Click “Confirm & Save”
Step 4. Use a JavaScript Snippet to Hide The Checkbox When a Known Prospect is Already Opted In
Drop this script below %%content%% in your layout template (or in the form’s “Below Form” section). If the box is already checked, it hides the whole field on load:
<script>
  window.addEventListener('load', function() {
    var optInField = document.querySelector('p.Email_Opt_In');
    if (!optInField) return;

    var checkbox = optInField.querySelector('input[type="checkbox"]');
    if (checkbox && checkbox.checked) {
      optInField.style.setProperty('display','none','important');
    }
  });
</script>
Want to tweak fonts, spacing, or colors? Just add your own CSS in the <style> block—no need to touch the logic.
With this setup, you get a clean, GDPR‑compliant checkbox that appears only when it needs to—and stays out of sight when it doesn’t. No complex automations, no messy CSS, just good tech hygiene and a better user experience.
In the next post, I will detail configuring automation and the Salesforce integration for a compliant set-up leveraging Pardot’s out of the box Opt Out field.
If you need help setting up a GDPR compliant email opt in system for your business, feel free to contact me here!